YayBlogger.com
BLOGGER TEMPLATES

Friday, 29 January 2016

Days 21-30 of 30 Days of Makeup Challenge.

Here is the final instalment of the 30 Days of Makeup Challenge!

I hope you have all enjoyed this and again if you aren't already, please like my facebook page - link here.
Not going to lie with this week and a bit I sort of just gave up on it, I was having to wash my brushes a lot more often than normal and my face was just hating on me, so I decided to only do a couple of this weeks. Here they are...

Day 21 - Crazy Lines.


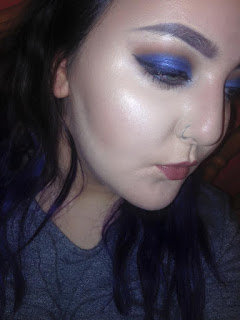
Day 22 - Blue Lagoon.


Day 25 - Contour


Overall review of 30DoMC:

I think it was amazing to do if there was no way you could end up completely ruining your skin, haha, looking back i would've maybe only done it every 3 days or something but oh well. I'm glad I done it as it got me to experiment a little more with my makeup which I really enjoyed and I tried things I hadn't ever tried before.


5 Favourite looks:

Funnily enough some of my favourite looks are the more colourful ones!


I hope you've enjoyed these posts! If you haven't actually seen the first or second posts, I'll link them here and here..

Thank you for reading!

x x x x x x x 

Tuesday, 26 January 2016

Eyebrow Routine.

Hey lovelies!

I just thought I'd do a post I'd kind of wanted to do for a long time. I'm going to show you what products I use to get my brows from this:


To this:


First of all, I KNOW THAT MY EYEBROWS ARE NOT TIDY! I have gotten a few comments about it and I delete them every time. I know they're untidy, I don't touch them because I'm growing them out as much as possible purely because I want them to not be shit, basically, so the more I grow them out the better they'll look when I get them done. So, yeah, take that.

Okay so first I generally always have a concealer around the area, this time I used the Makeup Revolution ultra cover and concealer in light. I then brush through them with a spoolie/spooly (idk??) and make sure they're sitting in a way that makes them easier to do. So next I use either Illamasqua's browcake in Gaze or Anastasia's dipbrow in Dark Brown (today it was Illamasqua) and I draw a rough line under my brow, making sure it's pretty dark from the middle to the tail and quite light to the centre. Next I do the same on top of the brow and fill in the tail and middle of the brow. Next I get a light brown eyeshadow to fill in the front for a sort of gradient effect. I clean up with concealer and voila, from no brows to brows! :)


Thank you for reading, I hope you enjoyed!

x x x x x x x x

Sunday, 24 January 2016

Golden Soft Cut Crease.

Can I just start off this post by saying Illamasqua retweeted this and I've never been more excited in my life?!


Anyway, hello lovelies. I decided to do a post on a look that got a lot of attention late last year and since I love it so much I figured it was worth a mention on here.


This is the look. For it I used:

Anastasia Dipbrow Pomade in Dark Brown
Makeup Revolution Ultra Cover and Conceal palette in light
A gold eye base (Don't know where it is so can't say what it was, sorry)
Illamasqua Pure Pigment in Furore
Makeup Revolution Salted Caramel Palette
L'Oreal Superliner
Soap & Glory thick and fast mascara
Illamasqua Skinbase in 5
NARS Radiant Creamy Concealer in Vanilla
Anastasia Contour Kit in light
Velvet Teddy MAC lipstick.

For this look I started off as always with the brows and cleaned them up with concealer before moving on. I layed down a base of concealer, setting it with the palest matte shadow in my Makeup Revolution palette and then highlighting the brow bone with the palest shimmery shadow. I then went on to use a light orange/brown transition shade, further darkening it with a darker brown. I then used my gold eye base and then pressed Furore by Illamasqua on top of it. I made sure the pigment was how I wanted it to be before going back in with my dark brown eyeshadow to 'cut' the crease. I done this until I was satisfied with how it looked, making sure to continue blending along the way.
Afterwards I done my liner, foundation, lips, mascara and contour before finishing off the face with a mist of a facial water just to bring all the powders together and make my makeup look more dewy.

I really loved this look and can't wait to try do this with more colours.

I hope you enjoyed this post, thank you for reading!

x x x x x x x x 

Wednesday, 20 January 2016

Days 11-20 of the 30 Days of Makeup Challenge.

I hope you all enjoyed the last instalment of this, if you haven't seen it here is the link. Check it out! :)
Also decided that for the rest of the challenge I'm going to miss out a few days just because my skin is getting really painful with wearing makeup every day etc.


Day 12 - Smokey Joe.


I absolutely loved the way this look turned out! May be my favourite look so far.


Day 13 - Bronze Goddess.


Wasn't really feeling myself this day so this is the only pic I have, sorry!


Day 14 - Green Eyed Monster.


Absolutely adored this look! Really, really enjoyed it. Also enjoyed doing a more 'natural' brow.


Day 16 - Bold is Gold.


Dat 19 - Here Comes the Bride.


Day 20 - Bedazzle.


Thank you for reading! I hope you enjoyed and tune in for the last instalment of this! Again if you haven't liked my Facebook page yet then please do so <3

x x x x x x x 

Friday, 15 January 2016

Illamasqua Lip Product Collection + Review.

Hello again my lovelies!

I thought today I'd do a little Illamasqua lip product collection post along with swatches both on my arm and my lips! I absolutely love Illamasqua as a brand and their lip products are amazing quality. I absolutely love them!
I'll try to link everything that I can!

First off, their packaging is black (aka my fave colour) and sleek and just very pretty. I love it. They have a huge selection of colours ranging from the neutral nudes to the craziest colours. There's definitely something for everyone.

The Illamasqua website is incredibly helpful for online shopping because they show swatches on different skin tones and a moving swatch which I LOVE. It makes the whole experience of picking something you know you'll like so much easier rather than ordering something and hating it when it gets here.


Here are the swatches:


Figured I'd do one picture with flash and one without.


From left to right: Rockabilly, Severity, Resist, Divine, Box, Fierce, Shard & ESP.

Please excuse my eye makeup in the following photos, I'm currently doing the 30 Day Makeup Challenge and this was the only time I could do the photo swatches on my lips - so they do look a bit crazy with the makeup at times. Here are the swatches on my lips and mini reviews:


Just to make it ridiculously uneasy for myself, I started doing the lip swatches in a different order than I'd done with the arm ones. Anyway, this is Fierce. It's an Intense lipgloss. It's gorgeous, pretty opaque and definitely 'fierce' as it's name suggests. Love the formula and they smell SO good.


This is Divine. It's a sheer lipgloss so a lot less opaque, still smells good like the intense lipglosses, formula is really nice and doesn't feel goopy or anything on your lips. Also kinda digging my eyemakeup with this lip colour! Unfortunately couldn't find this on their website, so I'm assuming the sheer lipglosses have been discontinued, sorry!!


This is Rockabilly. I can't tell you how amazing this is, it's just SO pretty. It's a gorgeous rosy red colour, perfect pin up colour and very creamy and moisturising. I love it. It's one of their 'Glamore' lipsticks meaning it is a satin finish. Love this shade, dying to get more of the Glamore lipsticks!


Next up is Resist. Just apologising in advance for this and the rest of the lipstick swatch pics as my lips were on fire by this point and my application got a bit messy/out of line, sorry! Anyway, this is one of their matte finish lipstick and lemme tell you, you will never find a more matte lipstick in your LIFE! However because of this it can be a littttle bit drying, but not enough to bother me. I love how long it stays on and it's very opaque. Love this shade. Again I'm so sorry but I think they have discontinued this shade as I can't find it on their website!


This is Shard. The first lipstick I ever bought from Illamasqua - the one little tiny thing that started my obsession with the brand itself! I love this colour, it's gorgeous. Another one of their matte finish lipsticks, stays on for hours, very opaque and lovely. 


Next up is Box. I love this shade. A perfect mix between pink and red. It's stunning. And matte. Which is also good.


Next up is ESP (and me looking super buzzin about it matching my hair, sort of) this colour is bold and beautiful, matte finish and just all round amazing. I absolutely love it. Didn't really manage to pull it off before but I think now the bottom of my hair is this colour I'll be able to pull it off a lot more ;)


Lastly is their lip colouring pencil in Severity. This is a shade I love lining my lips with before putting ESP or Shard on as it makes it look a bit darker and deeper, gives it a bit more definition. Also still gorgeous all over the lip though. I love this shade and I often compare it to Nightmoth - but not exactly the shade of it, maybe like 2 shades lighter. It's very very pretty.

Overall I love Illamasqua in general as a whole brand, I think they are amazing, pricey, yes, but amazing. The colours speak for themselves really, all unique and gorgeous and definitely worth a look at!

Thank you so much for reading! I've loved doing this post, I quite like this kind of style too. Except my lips being sore, that indeed sucks lol. Hope you've enjoyed! See you back here soon :)

x x x x x x x