YayBlogger.com
BLOGGER TEMPLATES
Showing posts with label illamasqua. Show all posts

Thursday, 26 May 2016

Dita Von Teese Inspired Makeup Look.

Hey lovelies!

I was inspired to do this post because I honestly just love Dita Von Teese and she's just so beautiful. She makes me want to buy loads of corsets and waist train and be just the perfect pin up beautiful lady that she is, haha! Anyways, I seen this photo in particular:


(Sorry for the NSFW photo)
And felt like I had to do a look inspired by it! Obviously it's not going to be exact but that's just life and I added highlight where she didn't and I kept to bronzer rather than adding blush, purely because of personal preference.

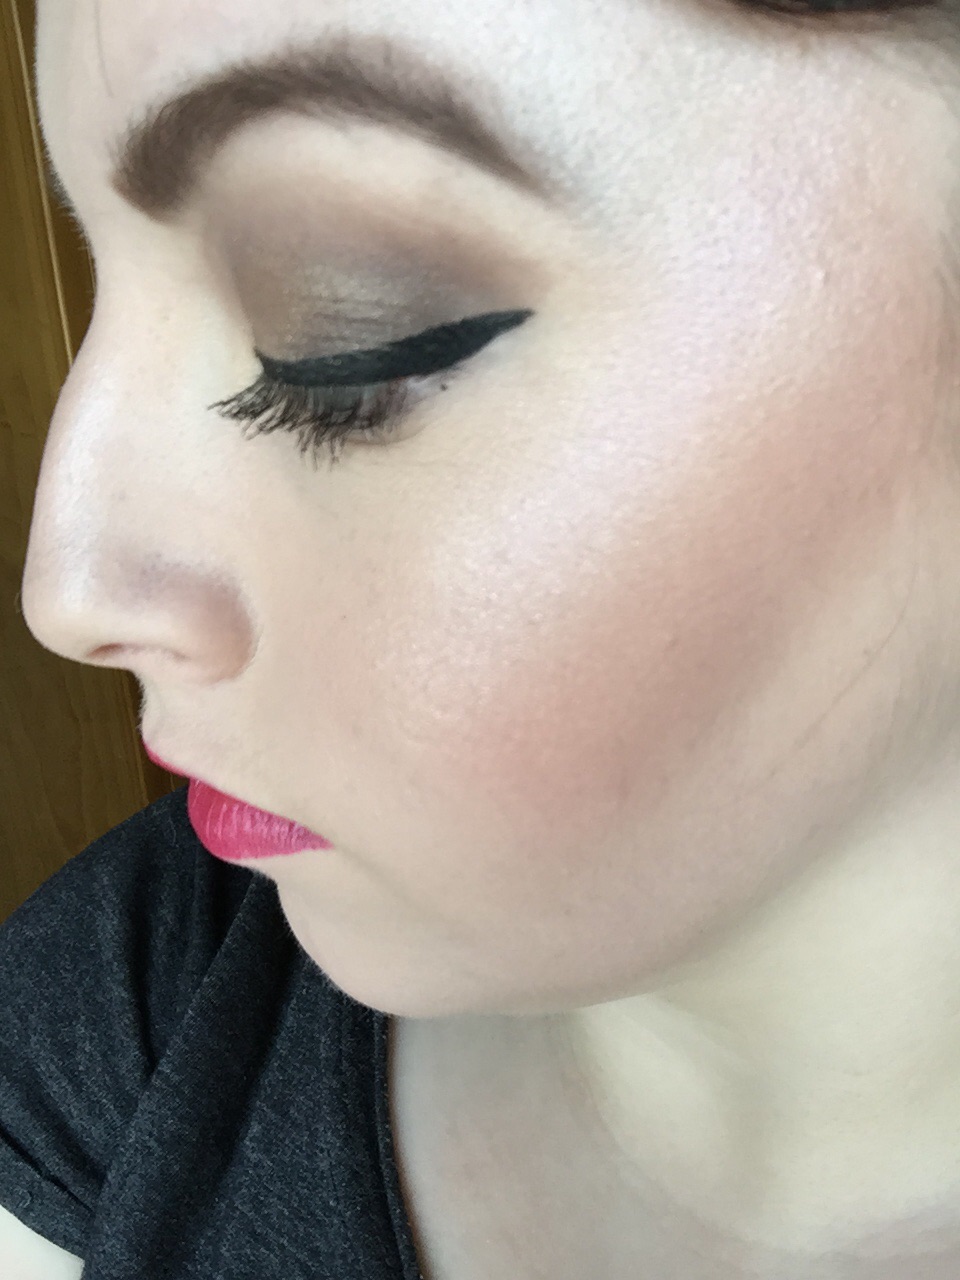
Anyway here is the look I came up with:


I obviously had to add the trademark Dita beauty mark and red lip :)

I used:

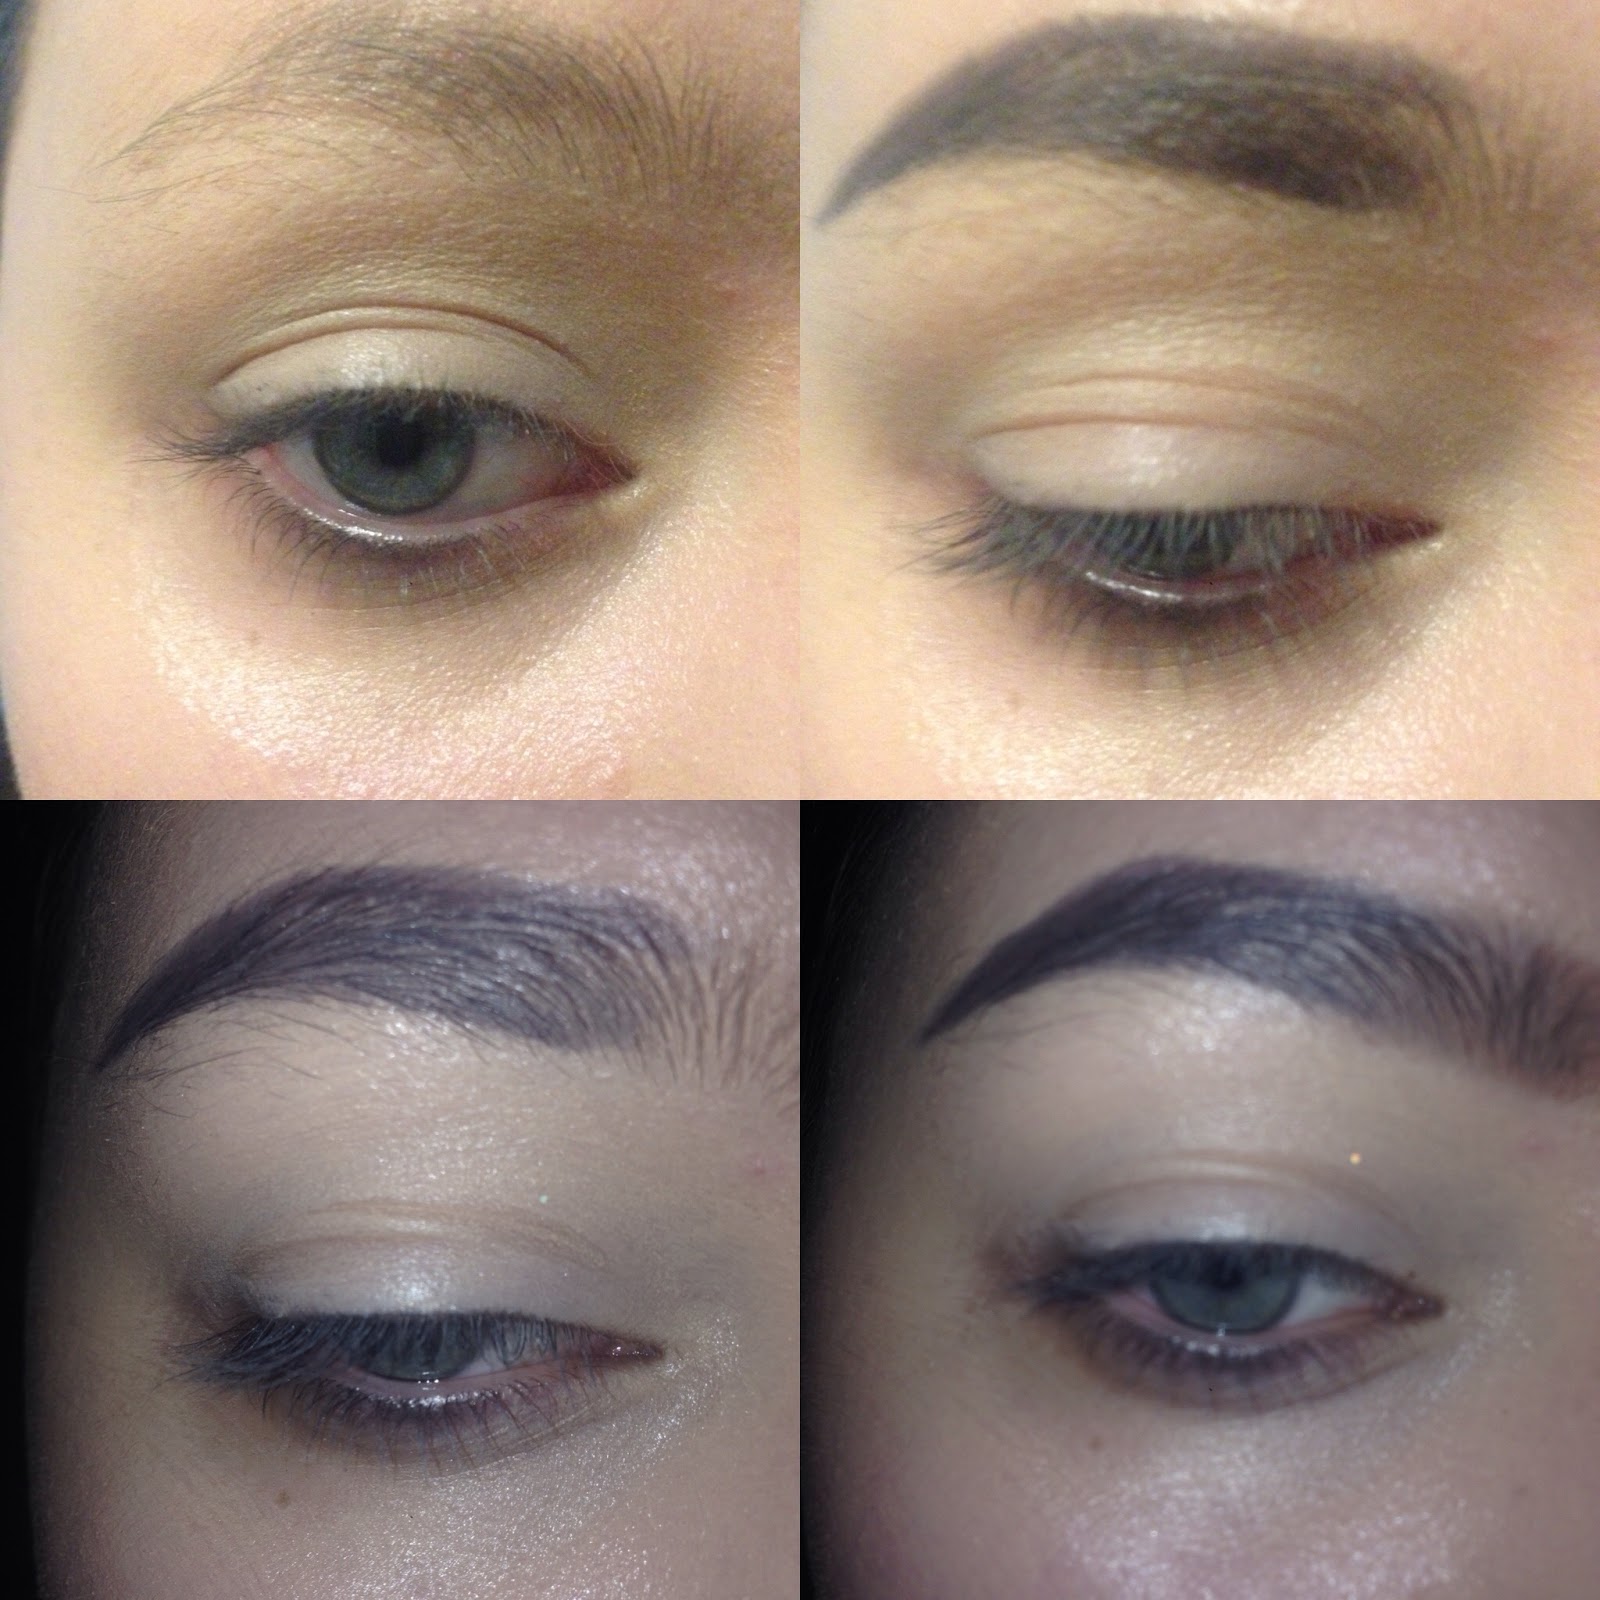
Anastasia Dipbrow in Dark brown to outline my brows and fill them in slightly, then Illamasqua's Browcake in Gaze to fill them in more because Dita's brows are incredibly beautiful and thick and dark, I then used a very pale shadow all over my lid once I'd primed it to highlight the brow bone and set my primer - I used MAC's Orb for that. Then I highlighted the brow bone more with a little bit of Shroom by MAC. I then went in with Makeup Geek's Shimma Shimma in the inner corner and MAC's Wedge in the crease, I made sure to thoroughly blend it out so there was no harsh lines and Makeup Geek's Peach Smoothie mixed with Orb again just above the crease to make sure it was blended nicely. I then lined my upper lashline with Illamasqua's gel liner in Infinity. I used Rimmel's Wake Me Up foundation in Ivory and Collection's Lasting Perfection concealer to get rid of some imperfections. Then going on to the lips (cause I just couldn't wait tbh) with Jeffree Star's Redrum liquid lipstick. I then went in with Anastasia's Contour Kit to bronze up my complexion and finally MAC's Soft & Gentle MSF to highlight my cheekbones!

Thank you for reading, I hope you enjoyed! :)

I quite liked doing a celeb inspired look so maybe look out for more of these in the future!

Other places to find me:

email/business - rachelgarmentmua@outlook.com
Instagram
Twitter
My other blog

x x x x x

Tuesday, 17 May 2016

Pinky/Cranberry Eyes | Youtube Video!

Hey lovelies!

If you came from my youtube channel and have never seen my blog before please have a look at other posts! My three most popular posts of all time are here, here and here. If you have no clue what I'm on about, check out my new video! Link is here.

Anyway, here is the look I created and filmed:


For it I used:

Anastasia Dipbrow in Dark Brown
Illamasqua BrowCake in Gaze
Makeup Revolution Ultra Cover and Conceal palette (light)
Makeup Geek Peach Smoothie, Bitten
MAC eyeshadow in Orb
Illamasqua Gel Liner in Infinity
Rimmell ScandalEyes Mascara
Collection Illuminating touch foundation
Rimmel Wake Me up foundation
L'OReal Lumi Magique Primer
Maybelline Babyskin Primer
Anastasia Contour Kit in Light-Medium
MAC MSF in Soft & Gentle
MAC Vanilla pigment (pressed by myself)
MAC Amorous lipstick


I hope you enjoyed the video and can maybe recreate it for yourself!

Thanks for reading!

Other places to find me:

Instagram - tod4ylovesmiledonme
twitter - rgarmentmua
my other blog - 
itsok4ytonotbeok.blogspot.co.uk

x x x x

Monday, 4 April 2016

Holy Grails: Top 3 Lipsticks.

Hey lovelies!

Another one of my Holy Grail posts! Today I'm bringing you my top 3 holy grail lipsticks!

Here they are:


I'm not really into neutral lipsticks, I am pretty much into just full on colourful or dark lips so here goes!


First up is Cyber by MAC. I love this dark purple colour, it's perfect over the Nightmoth lipliner by MAC and I just love this shade.

Next up is Illamasqua's ESP lipstick!


When my hair was just freshly done this suited my hair almost perfectly which was amazing!! I absolutely loved it! It's a perfect matte finish and lasts really well. Gorgeous on and gorgeous on darker skin tones as well.

Lastly is Jeffree Star's liquid lipstick, a review of which I have here.


This is in the shade Redrum and I'm really sorry about the wonky application but my lips were pretty sore by this point and I just wanted it finished by this point, haha! This is a gorgeous red, matte shade and I absolutely love it!

What are your favourite lipsticks?


Thank you for reading, I hope you enjoyed!

x x x x x

Tuesday, 29 March 2016

Holy Grails: Top 3 Foundations.

Hey lovelies! 
I just thought I'd do a post on a couple of my holy grail beauty items, these are all things I love and will continue to repurchase.

I started these posts with foundations because I think if your foundation looks shit, guaranteed the rest of your makeup will look shit and these three always make sure I definitely don't have that problem.

I'll start with the high end one..


So, this is Illamasqua Skinbase in shade 5, I am probably a 4 or a 3.5 but I was a lot more tanned when I bought this! This is very yellow based which is perfect for counter-acting my redness - which I absolutely love. It's also very full coverage without being too thick or heavy on your skin and I think it's amazing. Always use a good moisturiser beforehand though or it can make your skin look a wee bit funny, haha! 

Next is the Rimmel Match Perfection foundation..


I'm in the shade Ivory and this foundation is a medium coverage but definitely buildable. It's really dewy and pretty once it's on but it definitely needs set, which is probably the only thing I don't like about it.

Lastly is Bourjois Healthy Mix foundation


I've lost the lid for this so I do apologise! I'm in the shade Vanilla. This is a gorgeous foundation, very very dewy (which I love) and you don't necessarily need to set it as it does set but still looks dewy. I love it though as I love the shiny disco ball look, makes my dry skin look a LOT better. It's quite a light coverage but can definitely be built to a medium coverage. I use it whenever I feel like I need that little bit more dewy-ness on my face! Absolutely love it.


What are some of your holy grail foundations/base products? I'd love to know!

Thank you for reading, I hope you enjoyed!

Other places to find me:

Instagram - tod4ylovesmiledonme
twitter - rachelgarment
my other blog - 

itsok4ytonotbeok.blogspot.co.uk

 x x x x x 

Thursday, 17 March 2016

St Patrick's Day Inspired Makeup Look.

Hey lovelies!

I don't generally celebrate St Patrick's day too much but Happy St Patrick's Day to those who do! Tbh I just felt like playing around with some green shadow :)

So here's my look inspired by St Patrick's Day! 


Products used:
Anastasia Beverly Hills dipbrow in the shade dark brown
Makeup Revolution Ultra Cover and Conceal palette in light
Collection Translucent loose powder 
Makeup Geek eyeshadows in Peach Smoothie,  and Typhoon
Morphe 35B palette
Illamasqua gel liner in Infinity
Soap & Glory Thick & Fast mascara

 I hope you enjoyed, thank you for looking!

x x x x x

Monday, 7 March 2016

REVIEW: Illamasqua Pure Pigments.

Hey lovelies!

I got a few pure pigments from my fave brand, Illamasqua and I thought I'd just give a little review on them.

The colours I have are Berber, Android and Furore.


There is a decent amount of product in each which is really good. There is a lot of other colours as well which are gorgeous and I hope I'll get my hand on them one day! Generally to get the best pigment out of them you need a base and I'll show some swatches with and without a base.


Without a base, from left to right: Android, Furore & Berber.


With a base, from left to right: Berber, Furore & Android.

So as you can see the pigment of them is much stronger with a base which isn't too bad and they are unbelievably beautiful. I love these and think they are absolutely amazing! They are a bit pricey but I think they're totally worth it. Love, love, love them.

Thank you for reading & I hope you enjoyed!

x x x x x 

Thursday, 11 February 2016

Valentine's Day Makeup Look.

Hello lovelies!
I just thought since Valentine's Day is coming up I'd put a little V-Day inspired look on here.


Okay, so for this look I used:

Illamasqua Browcake in Gaze,
MAC Eyeshadow in Wedge,
Makeup Geek Eyeshadow in Bitten,
Urban Decay Buzz shadow from the Naked 3
Rimmel Exaggerate Mascara
Illamasqua gel liner in Infinity
MAC Glitter in 3D Silver
Makeup Revolution Ultra Cover & Conceal palette in Light
Illamasqua Skinbase in 5
NARS Radiant Creamy Concealer
MAC Soft & Gentle Highlight
Makeup Revolution Ultra Cream Contour Palette
Anastasia Beverly Hills Contour Kit - powder
Jeffree Star Velour Liquid Lipstick in Redrum

Thank you for reading! Hope you enjoyed :)

 x x x x x x x

Tuesday, 26 January 2016

Eyebrow Routine.

Hey lovelies!

I just thought I'd do a post I'd kind of wanted to do for a long time. I'm going to show you what products I use to get my brows from this:


To this:


First of all, I KNOW THAT MY EYEBROWS ARE NOT TIDY! I have gotten a few comments about it and I delete them every time. I know they're untidy, I don't touch them because I'm growing them out as much as possible purely because I want them to not be shit, basically, so the more I grow them out the better they'll look when I get them done. So, yeah, take that.

Okay so first I generally always have a concealer around the area, this time I used the Makeup Revolution ultra cover and concealer in light. I then brush through them with a spoolie/spooly (idk??) and make sure they're sitting in a way that makes them easier to do. So next I use either Illamasqua's browcake in Gaze or Anastasia's dipbrow in Dark Brown (today it was Illamasqua) and I draw a rough line under my brow, making sure it's pretty dark from the middle to the tail and quite light to the centre. Next I do the same on top of the brow and fill in the tail and middle of the brow. Next I get a light brown eyeshadow to fill in the front for a sort of gradient effect. I clean up with concealer and voila, from no brows to brows! :)


Thank you for reading, I hope you enjoyed!

x x x x x x x x

Sunday, 24 January 2016

Golden Soft Cut Crease.

Can I just start off this post by saying Illamasqua retweeted this and I've never been more excited in my life?!


Anyway, hello lovelies. I decided to do a post on a look that got a lot of attention late last year and since I love it so much I figured it was worth a mention on here.


This is the look. For it I used:

Anastasia Dipbrow Pomade in Dark Brown
Makeup Revolution Ultra Cover and Conceal palette in light
A gold eye base (Don't know where it is so can't say what it was, sorry)
Illamasqua Pure Pigment in Furore
Makeup Revolution Salted Caramel Palette
L'Oreal Superliner
Soap & Glory thick and fast mascara
Illamasqua Skinbase in 5
NARS Radiant Creamy Concealer in Vanilla
Anastasia Contour Kit in light
Velvet Teddy MAC lipstick.

For this look I started off as always with the brows and cleaned them up with concealer before moving on. I layed down a base of concealer, setting it with the palest matte shadow in my Makeup Revolution palette and then highlighting the brow bone with the palest shimmery shadow. I then went on to use a light orange/brown transition shade, further darkening it with a darker brown. I then used my gold eye base and then pressed Furore by Illamasqua on top of it. I made sure the pigment was how I wanted it to be before going back in with my dark brown eyeshadow to 'cut' the crease. I done this until I was satisfied with how it looked, making sure to continue blending along the way.
Afterwards I done my liner, foundation, lips, mascara and contour before finishing off the face with a mist of a facial water just to bring all the powders together and make my makeup look more dewy.

I really loved this look and can't wait to try do this with more colours.

I hope you enjoyed this post, thank you for reading!

x x x x x x x x 

Wednesday, 30 September 2015

Neutral Smokey Goodness


Some neutral smokes with a pretty out there contour/highlight for my cute little baby cousin. I can't recall ALL of the products I used, nor all of the exact names but I do remember that this look has been created with mostly drugstore products :) but from what I can remember, here is the product deets:


  • Benefit They're Real Push Up Liner
  • Benefit They're Real Mascara
  • Makeup Revolution Contour Kit
  • L'Oreal Brow Kit
  • W7 Eyeshadow palettes (the more neutral ones, can't remember the names exactly)
  • Rimmel Wake Me Up Concealer
  • Static Pigment by Illamasqua
  • Rimmel foundation (again, can't remember exactly which one, it's the one with the red lid)
Thank you for reading and I hope you enjoyed looking at my lil babe!

Saturday, 16 May 2015

Cut Crease Look.

Hi lovelies!
Sorry about the lack of posting, been sort of stressed/trying to get youtube sorted/having a mental block with posts to do. I have some ideas now though so things should hopefully be a lot more regular if all goes to plan! :)

Okay so disclaimer: I am not saying this is a PERFECT cut crease, it is not, I've seen so many better but the point is to practice and better yourself. And I've also found a photo of five months ago when I tried a cut crease vs this one I done for this blog post and there's a massive improvement...


So I guess what I'm saying is yes I know this isn't perfect but it's a HELL of a lot better than one I done a while ago. (Except I wish I had the skin that I had 5 months ago, I cry) Anyway, practice makes perfect and all that jazz. I'll get there and so can you!

Okay, so as always, if the products I have used are still available, I will link them. But for this look I used:

FOR THE FACE
FOR THE EYES/LIPS
So obviously you can do this with any colours you have as long as you follow the same steps but I figured I'd just list everything I used anyway.
So without further ado, here's how I got this look.


  1. Moisturise your skin, make sure you have it nice and moisturised so your foundation can be even more glowy AND it gives it more time to settle in to your skin whilst you do your eyes.
  2. DO NOT DO YOUR BASE FIRST. Falldown is your enemy. Make sure it doesn't ruin the rest of your makeup by just following this simple step!!
  3. Prime your eyelids. Make sure you set it with an eyeshadow similar to your natural skintone. I just used my Rimmel Stay Matte powder.
  4. Using Nightmoth lip pencil (It's soft enough to be used in and on the eyes, trust me) draw/carve out your crease. You can do this either directly in the crease or if you have hooded eyes like me, a little bit above it - to create a new one.
  5. Using a very small dense pencil brush, buff out the line you just drew, only above it though to blend it out, not below it. Keep adding more pencil and blending it out until you feel your line is defined enough.
  6. Then, using a fluffy blending brush, blend out that line more with eyeshadows. (I mixed the shade Nooner from the Naked 3 Palette and Forgiveness from the Complement palette) If you feel you have lost some definition in the crease line, go back in with the pencil. This can be as defined or soft as you like. Just go with what you think looks right.
  7. Next, to "cut" the crease, pat a very light shadow (I used the very first one from the Naked 3, I can't remember the name at the moment) all over the mobile lid. Make sure you don't lose the definition you've created and don't worry if you do, just go back in with the pencil again.
  8. Next, eyeliner. You can do your eyeliner as thick or thin as you want, I went for thick just because it's the way I prefer it. 
  9. Now with your eyes done, make sure you've wiped any falldown away, moisturise your skin again or use your primer. I personally don't use one. Do the rest of your base as you normally would and finally add mascara (and/or lashes if you like)
Your finished eyes should look a little something like this :)


Hope you enjoyed this post!! Where else to find me:

Facebook - https://www.facebook.com/rachelgarmentmua or https://www.facebook.com/rachel.garment

Instagram - rachelgarmentmakeup or tod4ylovesmiledonme

Twitter - rachelgarment


x x x x x 

Friday, 24 April 2015

What's In My Everyday Makeup Bag & Current Everyday Makeup Look.


I thought this would be a good wee post to do as I don't love wearing lots of makeup day to day but I thought I'd show what I do wear step by step. :)


1. I use this Garnier Moisture Match (this is the one for dry to very dry skin) this stuff is often on sale for only £1 in tesco which is a total bloody bargain for what it is!! I love using this to moisturise before foundation because it leaves everything perfectly hydrated.


2. Next I'll prime my eyelids. This one is the Barbara Day smoothing eye makeup primer. It doesn't really matter which one you use, I feel they all work the same really as long as there's that base down before you use any shadows or anything.


3. Next using the fluffy blending brush (the orange one) I put the colour Concrete by MAC through my crease and make sure it's perfectly blended before using the flat brush and the colour Satin Taupe all over the lid and just up to the crease. Again making sure it's perfectly blended before I go on.


4. Ok so next using this teensy cute tiny angled brush and my Illamasqua Brow Cake in Gaze, I create completely new brows for myself since I was cursed with a crappy, sparse brow! And I long for strong brows so this is the only way I can get them for now :p


5. Next, I'll blend my foundation all over my face. The foundation I'm using depends on how my skin looks, I'll normally opt for Rimmel Wake Me Up but yesterday when I was doing my makeup (and taking these photos) my skin was looking a bit crappier and I opted for Illamasqua Skinbase in 5. I love this as its a medium to full coverage, beautifully blendable, buildable and just sits amazingly on the skin.


6. Using my fave powder of all time, I powder the centre of my face only (forehead, chin, nose, under eyes. You know, the places it ain't cute to be oily)


7. Next I'll finish my eyes off with mascara, this one is the Rimmel Day 2 Night. It's ok, I guess. :)


8. Using MAC's Vanilla pigment I brighten up the inner corner of my eyes and give myself that beautiful glowy, dewy look. 


9. To finish off I warm up my complexion with MAC's Bronzing Powder in Golden.


Here's the finished look! :) sometimes I use Velvet Teddy by MAC on the lips (aka best nude evaaaa) but yesterday it was way too warm and I just wanted to drink so much water and couldn't be bothered haha :)

Anyway I hope you enjoyed this post! I enjoyed writing it :) sorry for the lack of action on this blog. Will get back into it v soon.

Instagram - rachelgarmentmakeup or tod4ylovesmiledonme